Ambex YM-2 concerns, questions or advice

sdcoffeeroaster

New member
Apr 19, 2010
31
0
Visit site
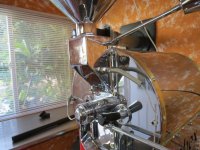
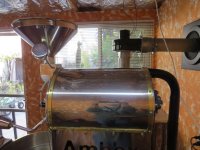
Peter: The photos I posted are pretty low-res, I pulled them from the site where it was being sold. I'll take better ones soon, with the rear plate removed so there is a view inside. I had planned to follow the ducting backwards to the drum to see if I could find any obstruction.

Gila: Do you have any photos of the exhaust port and internal ducting for your machine? I'd love to see mine has a different design, or if something is missing.

Thank you!

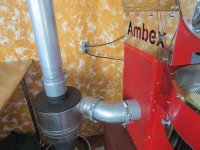
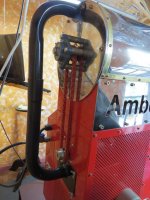
I think you must have something like the 2004 version shown in this picture. I can see that the upper port is plugged like yours. Maybe this person can advise you? If you remove that cover and shine a light into that port you might be able to see right to the front. If you put some sort of fan at this port I bet you will draw air thru the drum because that's how the 2009 versions work. There must be some other missing part on your roaster because there has to be some way to allow air to pass into the back of the drum (perforated) and on up thru that valve that allows the coffee to drop into the drum.

With your version the panel for removing the coffee after cooling is a much better design. I just finally removed the stirring arm on my 2009 unit and brush all the coffee out with a large pastry brush.

http://www.coffeeforums.com/forum/business-business-b2b/13185-sold-ambex-ym-2-5-roaster.html

I just found this you tube video of your style roaster. Seems like it also had a direct drive motor. I can't tell. I also don't see where they connected anything to that port so there must be some internal ducting as was described in an earlier post.

https://www.youtube.com/watch?v=wftn8yH_5vI
 
Last edited:

Gila

New member
Jan 4, 2015
19
0
Visit site
I sure wish I was looking at your roaster. Gila's photos don't help me, as I can't tell where that duct is that he's talking about.

Gila: Do you have any photos of the exhaust port and internal ducting for your machine? I'd love to see mine has a different design, or if something is missing.

Yeah I was afraid the pics weren't too clear. How's this?:

2015-02-10 09.05.19a.jpg2015-02-10 09.03.29a.jpg2015-02-10 09.03.42a.jpg

Edit: the 4" exhaust outlet port is on the outside of the machine where the two side by side arrows are in the last pic. I can take more pics if needed.
 
Last edited:

Gila

New member
Jan 4, 2015
19
0
Visit site
Without taking the faceplate off I can't be sure but I'd guess there's some kind of intake plenum somewhere above the drum.

Edit: looking through the lower bean drop door straight back there are vent grilles in the back of the drum

Edit2: here's a pic of the exhaust next to what is probably the exhaust duct access door:

2015-02-12 17.22.15.jpg
 
Last edited:

Kilowatt

New member
Feb 1, 2015
21
0
Podunk
Visit site
Gila, I have that same plate next to the exhaust port, with the knurled nuts. When I took it off, I was almost buried in chaff. I don't think this machine was ever cleaned, or at least not recently. It did give me access to the ducting, but there still seems to be an obstruction deeper in the machine. With how dirty it is, I'm not surprised.

Once the next blizzard has passed (after tomorrow), I'll dig deeper and take some decent photos. I'll have to ask around and see if anyone I know has any kind of fiberoptic camera, that would help quite a bout to figure out what is blocked.

I still think ultimately, I will put a low-cfm blower and a cyclone off the port in the back, and leave the damper lever permanently set for the cooling tray. Ideally, I would rewire the machine too so the stirring arm and cooling tray fan activate together on the second switch, while the drum motor and convection/expeller fan activate on the first switch.

My 15 kilo has 4 motors and 4 separate switches, which is what i am familiar with, so trying to get my mind around this very different configuration.

Thanks all, I'll post again soon.
 

peterjschmidt

Active member
Oct 10, 2013
1,158
1
Milwaukee, WI
Visit site
I have what looks like a bottle brush with a long 30" flexible handle. It works great for getting to areas of my roaster than shorter brushes can't get to. The previous owner of the roaster included it in the sale, so I can't say where to look for one.

I mounted a second blower onto the cooling tray clean-out port, and then wired that blower into the circuit for the stirring arms.
 

Kilowatt

New member
Feb 1, 2015
21
0
Podunk
Visit site
Peter, brilliant idea! I think I still have a set of those brushes, they are for cleaning out dryer ducting. That should help me get it cleaned out so I can see what's what inside, I can worry about upgrades letter. :)

As long as my wife doesn't kill me for getting chaff in the dryer brushes.... hmm.
 

Kilowatt

New member
Feb 1, 2015
21
0
Podunk
Visit site
Here are some images with the configuration (Finally!) of the roaster, and the problem seems to be the design of the machine itself. The only inlet for air to provide convection for the drum is a tiny, 1/2" hole in the side of the air channel about level with the burners. Please note the expertly drawn arrows to denote airflow. :) Don't worry, I won't quit my day job.

This explains why the machine smokes like a fiend and drips coffee oil everywhere - there is no convection to draw off the smoke (or chaff, for that matter).

From what I can tell my best recourse will be to install a proper fan and cyclone coming off the back (I included a picture of the plate cover, but not the inside. It appears to be the same internal configuration as my 15 kilo, but missing the fan and cyclone). Is there anyone from Ambex on this site who could offer some insight? I thought I saw a post from Paul Ribich a while back, but not sure

Appreciate any thoughts, and thank you!

AccessPlate.jpg Airflow2.jpg Airflow3.jpg Airflow4.jpg DrumPerforation.jpg
 
Last edited:

Kilowatt

New member
Feb 1, 2015
21
0
Podunk
Visit site
And here are a few additional photos of my machine, the control box, etc:

Connectors.jpg ControlBox.jpg Damper1.jpg Electrics.jpg
 

Attachments

  • DrumPerforation.jpg
    DrumPerforation.jpg
    414.1 KB · Views: 118
Last edited:

sdcoffeeroaster

New member
Apr 19, 2010
31
0
Visit site
So If you take that access plate off in the first picture and shine a light inside what do you see? On my newer YM-2, the flow from the drum comes out of that access plate port. The air is pulled from the perforations at the back of the drum, thru the coffee, up thru the top of the front plate at the drop gate and then back thru a passageway on top of the drum (not part of it) and out this port. This port is connected to the main fan by means of a header pipe that connects to this access port and another larger square port below the drive motor (or output shaft from the motor in my roaster.
 

Attachments

  • front.JPG
    front.JPG
    123.5 KB · Views: 218
  • side.JPG
    side.JPG
    123.9 KB · Views: 180
  • exhaust.JPG
    exhaust.JPG
    131.6 KB · Views: 309
  • back.JPG
    back.JPG
    82 KB · Views: 190
Last edited:

Kilowatt

New member
Feb 1, 2015
21
0
Podunk
Visit site
sdcoffeeroaster,

Thank for the pics. Looks Ambex has significantly changed their design since mine was built, mine is a direct drive motor for the drum, and airflow for drum and cooling tray use the same blower with a 2-way damper lever to switch between the two.

I removed the drop gate so I could look through to the back port, and found that the first 3 inches of the channel that goes to the port on the back was jammed with creosote. It is the one part of the machine I had not disassembled, of course. The ramp in the gate was also really fouled, and was retaining beans, which explains the odd under-roasted beans in my test batches. Cleaned all of that out, and actually have airflow through the drum now. Not nearly the CFMs that I would like, but it is removing smoke and blowing out chaff. I ordered an inline blower and a cyclone to improve the airflow through the existing channels. Down the road, I am going to have a part machined to bolt to the back port into dedicated ducting with its own fan and damper for draw.

Looks like at one point, the prior owner may have had a fire in my roaster, as the drop handle sits at a pretty low angle near the drum - looks like the metal overheated and bent down. Need to find someone who can correct that as well. Minor problem, though. :)

Really appreciate the input!
 

sdcoffeeroaster

New member
Apr 19, 2010
31
0
Visit site
the old ym-2 had one thing that was much better, the cooling tray. They cost reduced the newer ones and so when you remove the plate to dump the coffee from the tray, the stirring vanes can't possibly force any coffee out. So you have brush it out around the stirring vanes. The older cooling tray door, like most if not all roasters, removes part of the floor of the tray. So the the stirring vanes force more of the coffee out. I finally just removed the vanes on mine and use a large pastry brush to get the coffee out.

If anyone knows where I can buy an old cooling tray let me know. Don Vinning, who was the main tech at Ambex, told me he knew that design would not work well but no one listened to him.

The ym-2 suffers from lack of air flow thru the drum too. I routinely have to de-chaff coffee post roast. And I've doubled the roasters fan speed on mine and added a downstream fan after my cyclone. I have an expensive digital airflow meter someone gave me and I know this set up has boosted my thru the coffee flow above 100 cfm, still not much but I probably have double the capacity of a typical newer ambex ym-2. It helps a lot and allows me to control the roast much better. The faster Baldor motor only cost me $160. and it was well worth it.
 

clinton

New member
Feb 9, 2014
5
0
Visit site
I did the same as sdroaster with the new Baldor and it makes all the difference. At times depending on the weather there is actually too much airflow and I don't need the post-cyclone fan turned on. It's still a poor design on Ambex's part but with the new motor it's workable. You still need to keep an eye on chaff buildup in the drop gate and resin buildup in the two L-shaped pipes on the back of the roaster. Easiest way to clean those pipes is to get a couple of rubber corks to plug the ends and fill them with Joe-Glo and boiling water. Hit them with a bottle brush and they'll come out smooth and clean.
 

sdcoffeeroaster

New member
Apr 19, 2010
31
0
Visit site
Good advice Clinton. I think I need to pull that drop gate. I'm always finding a lot of chaff in the front of the drum right before I do a roast at the beginning of the day. I've measured flow with the two fans and it's about double thru the drum with the faster fan on the roaster and the cyclone on. And yes it can be too much at times but really gives you more control to slow a roast as well. I've considered moving the tryer to the left side or enlarging it and maybe putting a larger site glass in the door. Have you done anything like this? The tryer is really useless.
 

clinton

New member
Feb 9, 2014
5
0
Visit site
The tryer is worse than useless. Sometimes I get one bean. It's too small and it's location is wrong. I talked to Amer from Ambex on the phone and he sent me a tryer for a 5 kilo. The length turned out to be good (it didn't hit the drum vanes) so I asked him to please send me a 17mm face plate that fits the tryer. After 5 phone calls and 5 emails, I finally gave up. He just didn't seem interested. I am going to try one of the Turkish roaster manufacturers for the face plate. I would move it to the left side also. A machinist can bore out the front of the roaster easily. A friend of mine kept the tryer in the same place but welded a little scoop onto the drum that chucks the beans over to the tryer. That's another option.
 
Top