Rebuilding Royal #1 Coffee Roaster

JitteryMonkey

New member
Dec 18, 2013
17
0
Rutherfordton, NC
Visit site
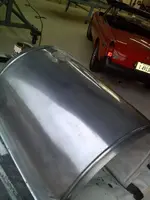
We acquired a Royal #1 Coffee Roaster recently and are in the process of rebuilding it so we can use it in our Small Town Coffee Roasters business we are starting in Rutherfordton, NC. I'm attaching some photos of the rebuild in progress and have some questions for those of you who have rebuilt vintage roasters. This roaster is going to be used daily and has the ability to roast up to 10 lbs. of coffee at a time.

We've been quite impressed with the build quality of this early 1900's roaster. Something that took us by surprise was how screwed in fittings were actually ball-peaned from the inside to secure and prevent parts from rattling. We also found that the cast iron parts had been copper plated in the past, so we have sandblasted all parts and have had much of it copper plated again. The pieces coming back from the platters are a bit dull and we are using stainless steel hand wire brushes to buff the copper plating.

So one of the questions I have is dealing with the preservation of the copper plating with a high temperature clear coating. Our research has turned up a spray paint clear coating from VHT. The SP115 Flameproof Satin when properly cured will hold temperatures up to 2000 degrees Fahrenheit. Way more then we need, but all the other high temp finishes went up 500 degrees Fahrenheit. Does anyone have a better, tested solution?

I have other questions that I will postpone until I find other folks on this great forum that have experience on rebuilding these vintage roasters. I'll also update this thread as we progress on the rebuild. Thanks for reading...

RoyalCoffeeRoasterRebuild-011.jpg RoyalCoffeeRoasterRebuild-012.jpg RoyalCoffeeRoasterRebuild-014.jpg RoyalCoffeeRoasterRebuild-015.jpg RoyalCoffeeRoasterRebuild-018.jpg
 
IMG_20131222_143941.jpgHere's a pic of the current state of the aluminum drum housing. It had some really nasty dents, but my dad found a local guy who restores vintage race cars and is helping with the sheet metal work. The housing still needs a few hours of polishing but the dents are gone!
 

Attachments

  • 1526363_10152087216864321_849777452_n.jpg
    1526363_10152087216864321_849777452_n.jpg
    67.5 KB · Views: 498

topher

Super Moderator
Staff member
Aug 14, 2003
3,916
64
Boca Raton
Visit site
It looks awesome! I worked at a place that restored a #5. They tore it apart and rebuilt it completely. I asked what they did with the insulation and they said they threw it out. I said you can't do that..it was asbestos. They said don't worry we double bagged it. SMH.
 

JitteryMonkey

New member
Dec 18, 2013
17
0
Rutherfordton, NC
Visit site
It looks awesome! I worked at a place that restored a #5. I asked what they did with the insulation and they said they threw it out. I said you can't do that..it was asbestos.

Interesting because ours had no insulation whatsoever. In fact, it seems that there is an intentional airway between the aluminum outer cover and a steel inner cover which forces the hot air to circulate to the front of the roaster before it gets drawn out of the rear by the exhaust fan.
 

Royal1

New member
Jan 7, 2014
3
0
Visit site
Interesting because ours had no insulation whatsoever. In fact, it seems that there is an intentional airway between the aluminum outer cover and a steel inner cover which forces the hot air to circulate to the front of the roaster before it gets drawn out of the rear by the exhaust fan.

Any updates on your restoration?
 

JitteryMonkey

New member
Dec 18, 2013
17
0
Rutherfordton, NC
Visit site
Thanks for asking Royal1. Yes there are some updates. A bit slow because we have been doing other things like moving into our coffee shop, rebuilding a Sorrento Michelangelo 3 group head espresso maker and getting the zoning changed in this historical downtown district to allow for mix use of commercial space for an apartment.

Anyway, here are some more photos of the Royal #1 rebuild...
IMG_2206.jpg The interior drum sandblasted to remove old rust and coffee oils along with tiny rocks that had been embedded in the screen. Looking good now and we coated it with olive oil to prevent rusting. This drum is made of heavy duty steel that has been riveted together. Super quality!

IMG_2411.jpg I know my son posted a picture of the aluminum outer skin, but it was not quite finished. Many hours went into reforming and polishing this piece. Here it is completed! The aluminum is fairly thick, but very soft so it was salvageable and is going to keep our restoration project authentic with the original parts.

IMG_2391.jpgIMG_2393.jpgIMG_2394.jpg So we removed all the old varnish and gunk by light bead blasting and then hand sanding. As you can see, there is one area that had actually rotted away and we had to build it back up with wood filler. You will also see a small duct coming up from underneath the base. This duct goes to the front where the beans are dumped for cooling. A flange/damper on the roaster controls whether the fan pulls air from inside the roaster or from this opening to pull cool air through the beans for fast cooling.

I wanted to add a couple more images, but am unable to in this post. May be a max total images per post? Let's see if I can add them in a separate post. Just learning about this forum...
 

JitteryMonkey

New member
Dec 18, 2013
17
0
Rutherfordton, NC
Visit site
IMG_2396.jpgIMG_2407.jpgIMG_2460.jpg So to finish up this update, here are three more photos showing the restoration of the base for the Royal #1 roaster. The hardest thing to restore was the logos. I ended up using a concentrated solution of "Simple Green" cleaner. Sprayed it directly on the logo and lightly rubbed it to remove the old gunk. It worked great! Actually had to be careful not to remove the actual lettering. Seems that these logos were painted on top of a silver backed foil and includes white, black, and red pigments along with some gold leafing.

The final stain used is Minwax Dark Walnut Wood Finish and then sealed with three coats of oil modified polyurethane Minwax. The last picture shows some of the finished parts. You can see the copper colored chaff collector on the right side of the picture. Since we are clear coating the copper plated parts, we are going through some experimentation baking these pieces at 200, 400, and 600 degrees Fahrenheit. There is a change in color when the copper is baked, but we are actually liking the new color.

So I'll be back once we start assembling the roaster. Things are looking good... fingers crossed!
 

Royal1

New member
Jan 7, 2014
3
0
Visit site
That looks great. You guys are doing a terrific job with the restoration. Keep up the good work and thanks for sharing the pictures and details!
 

JitteryMonkey

New member
Dec 18, 2013
17
0
Rutherfordton, NC
Visit site
Thought I would give an update. We're not totally there yet, but here's a look at the rebuilt components of the Royal #1 Coffee Roaster put together for the 1st time since we disassembled the roaster...

View attachment 2020

hmm... what's with the display and editing of images? Tried changing image size and getting it to display and no go :-( (used both Chrome and Safari with no success)
 
Last edited:

PinkRose

Super Moderator
Staff member
Feb 28, 2008
5,228
14
Near Philadelphia, PA
Visit site
I'm not sure what's happening with your image. Maybe someone, who has had some success with images, will be able to help.

Are you uploading it from your computer or from a web URL?

Please try it again. This time, open up a message screen and go down to the right bottom corner and click on the Go Advanced button. A new screen comes up that has the insert image option (second row, 6th in from the left). Try inserting the image again.

I hope it works for you.

If you still have a problem, please contact one of the site administrators. (Unfortunately, Moderators don't have technical priviledges)


Rose
 

JitteryMonkey

New member
Dec 18, 2013
17
0
Rutherfordton, NC
Visit site
Top